
Since moving to our new house over a year ago, the garage has been a continual dumping ground for all and sundry much to the despair of the other half who has been desperate to create his ‘man cave’ workshop, a sanctuary from what he refers to as constant ‘nagging’ and what I see as ‘reminding’.
Bearing
in mind that entry to this ‘man cave’ is subject to special entry permission
for girls, I just couldn’t resist offering to come up with a few design ideas
to help him achieve order from the chaos.
Yeah, right.

Now in the same way as women collect shoes, men seem to accumulate offcuts of timber. “You never know when you might need a bit of wood.” says the other half. We have enough to build an ark which I guess might not be such a bad thing in these times of climate change but having it scattered about here and there offends my tidy nature. Hmmm – me thinks a wood store is needed.
Inspiration often comes from the most random sources and my light bulb moment happened as I was walking past some local allotments where a compost bin had been fashioned from an eclectic selection of pallets and planks.
So here’s how to make your very own wood store using a couple of old wooden pallets and some offcuts of timber/MDF.
Firstly acquire 2 x identical wooden pallets. Always ask the owner of the pallets beforehand as no-one likes their stuff being pinched, least of all me. If you can get them for free then so much the better as this wood store will cost you next to nothing to make.
Stand
both pallets up on their side facing each other with their planks facing
outwards. Gradually move them apart
until you decide on the perfect width for your wood store.
Determine your width by moving pallets apart

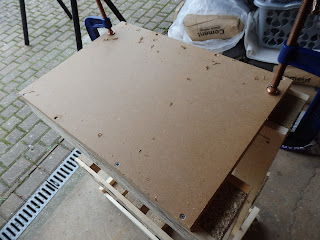
Next
make a base to screw onto the top of your two pallets. We used a thick piece of MDF that we had left
over from a previous project but a piece of strong ply or OSB will do just the
trick. Cut a shape that will fit the
length of your pallet and to your desired width.
Attach base to the top of pallets
Using
long wood screws, attach the base to the top of the pallets then turn upside
down so that the base is now at the bottom of your structure.
Turn upside down once base attached

To
hold the pallet sides in place, cut some timber into identical lengths. These should be the width of your
structure. We used 3 pieces of leftover
wood so that we could align the side pieces close to the horizontal planks on
the pallet.
Cut identical sized timber pieces for the side supports

Screw
the wood pieces to either side of your vertical structure remembering to keep
the bottom one level with the base and the top piece level with your top edge.
Attach side pieces to join both pallets together

You
should now have a fairly solid wooden structure that is ready to decorate.
Pallets with side pieces in place

As
pallets are made of quite rough timber, give it all a good sanding with a rough
grit paper to get the worst splintery bits off then re-sand using a finer grit
so that the wood is silky smooth to the touch.
Give it a good sanding to get rid of the rough bits

 |
| Nice and smooth, ready for decorating |
This
being an upcycling project, time to rummage through my collection of leftover
paint to find a suitable colour to brighten up a ‘man cave’. Couple of coats of a nice vibrant blue have
completely transformed these pallets into something else. However, if you like the look of natural wood
then you could just leave it all unfinished or give it a coat of clear varnish.
Decorate with stickers

Finish
off your wood store with some decorative stickers, decals or whatever takes
your fancy and hey presto, all those timber offcuts can be neatly stored away ready
for your next DIY project.
 |
| A perfect way to store your timber offcuts |
No comments:
Post a Comment