Pots and Cans

Pots and Cans

Monday, May 30, 2022

EXPLORING CHIDHAM

Confirmation received from the builders that work is due to begin on 6 June so this is our last mess free week before construction of our extension finally gets off the ground.  Hurrah! 

To kill time, a jolly walk in the surrounding countryside exploring one of the many peninsulas off Chichester Harbour in an area called Chidham. 

For the super fit, there’s a 5 mile circular walk around the entire area of Chidham and for oldies like us, there’s the ‘lets see how far you can walk before your legs drop off’ option where you can turn round at any point.


Circular walk around Chidham

The public footpath from the very small almost-drove-past-it car park, leads out to Chichester’s harbour designated an area of outstanding natural beauty with spectacular views across the water of Bosham.


Good footpaths

View across the harbour of Bosham

There’s plenty to see and photograph en route so you don’t realise how far you’ve walked until you start looking at a map.  We got as far as the beach section before New Barn.


Where's the sun gone?

We were lucky to catch sight of lots of wild birds, animals and flowers on our travels who like us, were also out enjoying the occasional glorious sunshine.


Snowy Egret


We saw a number of egrets

So cute


Oyster Catcher


Just look at this foxy fella having a sunbathe


Pink stripey wild flowers


Dandelion clock


I loved the two toned foliage of this plant


And the wispy cobwebs on this thistle head

It’s little wonder this area has been designated one of outstanding natural beauty because it truly is lovely.


Plenty of yachts to see


View from a bridge


Tide's out exposing the mudflats


Flinty beach full of unusual tree trunks


Possibly the remains of an old jetty?


Definitely an area of outstanding natural beauty


Thursday, May 26, 2022

FUN IN FUNTINGTON

 It’s fun in Funtington where it appears pigs outnumber village residents. 


Pigs as far as the eye can see


Funtington the pork capital of West Sussex

There’s crap all on telly so we’ve driven out to Funtington for an evening walk to socialise with the local porker population who are too busy snuffling in the dirt, wallowing in hay or catching zeds to be bothered with grockle paparazzi like us.


Oink!  Keep it down, we're trying to sleep here


There's only room for two


Dinner is served


Is that a truffle?

Pigs are not only delicious when sandwiched between a couple of slices of brown bread slathered in ketchup but they are incredibly cute too. 


I love you Sausage

It almost makes me want to go vegan but then again imagine a life without real bacon or sausages?  I mean some of the vegetarian ones are like eating those cardboard tubes from the middle of loo rolls! 


Three amigos

Sorry piggies, there’s some things that just can’t change and for me, giving up bacon butties is one of them.


Four legs good, two legs bad


Friday, May 20, 2022

RAISED POND PART IV - TOP COLLAR

Right then.  So far we have a large timber box filled with plastic and water that hasn’t leaked in three days.  Great but it doesn’t really look very pretty, does it?


No leaks but very unsightly

There’s that unsightly layer of overhang that needs sorting out.  A bit like my muffin tops only it’ll be a lot easier to trim these off.  Mine are going to need liposuction! 

But before we take scissors to the offending surplus underlay and lining, we’re going to add a nice timber collar to finish off the top edge of the pond and hide everything else.  

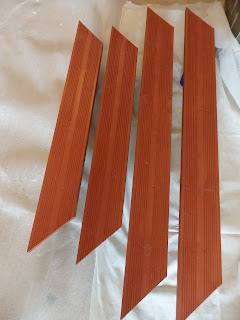
To make the top collar, use some more pieces of reversible decking.  This time cut the planks slightly longer than each side to allow for the corners to be mitred.  If you really can’t be bothered with all that mitre nonsense then just use straight pieces as it really doesn’t matter.  We used 2 x 2.4 m lengths of decking to cut out 2 x 1.19 cm long sections and 2 x shorter sections each 0.94 cm long.


Top collar pieces

Again, waterproof your timber with a suitable weatherproof product and leave to dry before fitting.


Suitably weatherproofed

The top collar is rather like making a picture frame that is going to sit along the top edge of the pond structure.  Each section of the frame needs to be centrally balanced on the edge so that it slightly overhangs both the inside and outside of the pond.


Top collar should overhang at the front and back

Right, now you can get the scissors.  Carefully trim off any excess liner/underlay so it is close to the top edge where it can’t be seen once the collar is fitted. 


Time to get rid of the excess overhang


Trim carefully with scissors close to the edge


Much neater and with enough overhang to trap under the collar

Screw each collar section into position carefully, tightly abutting the mitred corner joins – remember whatever you do, don’t pierce the liner below the waterline!  It’s quite a feat fitting the collar as unless you’ve made your pond with sleepers there is only a narrow edge for you to screw into.


Align the mitred corners before screwing down

And now for the great pond unveiling – ta dah!  All it needs is a few plants plus a solar fountain to create a calming oasis and habitat for any passing frogs or local wildlife.


Now top up with water to the desired waterline


Finished pond ready for plants and solar fountain


I declare our 'Special Landscaping Operation' to be a resounding victory - Russia take note!


View along the back border


View across from pond to RNLI shed


Border planting completed


Monday, May 16, 2022

RAISED POND PART III - LINING

If you thought laying underlay in a pond was a big faff then wait until you have to fit the pond liner.  Believe me, I don’t ever want to have to do that again! 

Great care needs to be taken when fitting a pond liner.  You want to make sure you don’t snag or puncture it in the process or else it will be useless and money wasted hence why I'm fitting this in situ to prevent rips from moving.  

When making up the corners, try to get as few creases as possible and ensure the corner folds are above the waterline or the pond may leak. This is easier said than done as pond liners are made of thicker, less flexible material than underlay so a lot harder to work with. 

Again, I started this process by laying out the entire liner on a flat surface and folding into thirds to create my pond liner ‘sandwich’ in order to get the thing into the pond. 

Carefully fold the liner over the top edge of your pond box but before securing it down, push the liner well into the bottom, around any plant shelves and into the corners so it won’t pull when you fill with water.  The last thing you want after all this effort is for it to tear with the weight of the liquid.  Use the clamps from the underlay layer to help you keep the liner in place as you work your way round the edges. 


Liner clamped into position

When you are satisfied that everything looks flat, folded and is not pulling then secure into position at the top edge.  I used a staple gun for this but remember not to staple below the natural waterline or you’ll get leaks from the staple holes.  I found it best to partially fill the pond then adjusted the liner with the weight of the water before finally stapling it down.


Partially filling with clamps in place 

And now, the moment of truth.  It’s time to fill that pond with water.  Do this slowly and keep checking for any leaks or fabric that looks like it’s being over-stretched.  Woo hoo – there are no leaks!!


Unlike the Titanic - no leaks


Saturday, May 14, 2022

RAISED POND PART II - UNDERLAY

Okay so far?  Good, we’ll move on to the next part of the project and this is where it all starts to get a bit trickier.


Waterproofing your raised pond


As the raised pond is made of timber then to help it weather the elements and extend the life of the structure it’s a good idea to give it a coat of something waterproof such as Cuprinol or other outdoor paint/varnish. Apply as per the instructions on the tin then leave to dry thoroughly. 


Looks better now it's painted

Once assembled and painted, position your pond structure in what will be its final resting place as the underlay and liner will be fitted in situ.  It’s going to be a tight space to work in – note to self; eat less cookies!


Putting the pond into its final position


Not much space to work in

To create shelves for pond plants, I’ve placed a few leftover bricks on a layer of sand sprinkled on top of the concrete base.  These are mostly at the back corners to raise any plants off the bottom.


Create submerged shelves for plants using bricks

When you have finished preparing the inside of your pond structure, it’s time to think about lining the inside with special pond liner and underlay.  I say ‘think’ because you really do need to work out how to do this carefully before getting stuck in. 

Pond liner and underlay can be easily purchased online from many suppliers.  I’m not going to give a lengthy explanation as to all the different types of pond liner/underlay available or recommend a specific type as there are loads to choose from.  This is for you to research online and purchase according to your preference or budget but I ended up getting mine from www.pondkeeper.co.uk who provided free underlay with the purchase of pond liner.  Most websites have a pond liner calculator so that you can work out how much you need based on the dimensions of your pond.


Just one of many online suppliers

There are lots of different types of liner or underlay

The underlay is a protective layer to ensure the pond liner is not punctured by any sharp edges.  The basic underlay I bought was similar to a fabric type of weed membrane, soft and easy to fold into place.  Begin by laying out all of the underlay on a flat surface so you can see the whole size/shape of it beforehand. 


I was able to get a double layer of this in the pond it was so big

I found it easier to place the whole piece of underlay in the pond by folding the fabric into thirds first with one section on top of the other.  This underlay sandwich can then be carefully placed into the pond structure and unfolded one layer at a time. 

Make sure the underlay lays flat on the bottom of the pond without being stretched so that it doesn’t tear when you place the liner on top and fill with water.  There should be as few creases as possible although with such a large piece of underlay I found it quite hard not to fold it a million times especially in the corners where you need it to sit quite flat.


Underlay carefully laid in position

With the underlay carefully laid in your pond, gently clamp to hold it in position whilst you go off for a well-earned cup of tea.  Don’t worry about the overlapping fabric at the top edge as there’ll be plenty of time to trim that later.